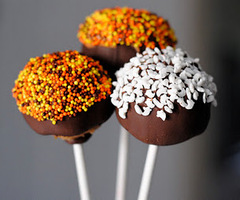
Saturday, September 29, 2012

Herbvillecrane Farms product review

Jeff Crane and Lynn Deau  have been friends of mine for many years.. I have tried almost all of their products  ( which include Herbs, Plants, Herbal Tea's, Rub, Sea Salts, BBQ Sauce and Dried Herbs) and I will tell you i love their herbal teas..
I realllllllly really love the lemon balm/verbena tea.. I think it just taste like fresh sunshine.. lol
This tea isn't a strong, over bearing taste, but very pleasant and refreshing, and bursting with  flavor..
My next fav.. would have to be the seasonal Blueberry... ( yummy, delicious.. made with fresh blueberries.. )
over all i would really say I have been pleased with all the products from this company..

the BBQ  Sauce is amazing on chicken, it is spicy but not to much ..its for the person that loves flavor, and is not so hot you can't eat it..

They also grow herbs  to sell on a all organic farm, in which has NO chemicals on their plants.. The last time I checked they had two greenhouses and over 75 plant varieties...

This company is a must to buy from, they are located in Lenoir NC, and sell at many festivals and farmers markets .. if you would like more info here is their facebook link.. and THEY ALSO SHIP INTERNATIONALLY...
 http://www.facebook.com/Herbville

Thursday, September 27, 2012

ROSEMARY CORN ON COB

Sweet Corn Grilled in the Husk  ( made this tonight omg) 

Grilling/steaming fresh corn on the cob in this way con­cen­trates it’s sub­tle fla­vor and offers myr­iad oppor­tu­ni­ties for but­tery embellishments. The result is so deli­cious, I never throw sweet corn into a pot of boil­ing water anymore.

6 ears of sweet local corn
Lemon Gar­lic But­ter or Parme­san Rose­mary But­ter (recipes below)
freshly ground black pepper
  1. Cut the stem of each ear of corn to a 1-inch length.
  2. From each ear of corn, remove 3 or 4 outer lay­ers of husk. Then, one by one, gen­tly pull back each layer of husk, but do not remove it. Remove all of the corn silk.
  3. Spread each ear of corn gen­er­ously with pre­pared but­ter, sea­son with pep­per, and care­fully bring each of the husk sec­tions, sequen­tially, back over the corn. Wrap the corn ears tightly in foil and refrig­er­ate until ready to grill.
  4. Remove the corn from the refrig­er­a­tor 30–60 min­utes prior to grilling.
  5. Place the foil-wrapped ears of corn over a hot grill, cover, and roast, turn­ing every cou­ple of min­utes, for 10–15 min­utes (10 min­utes longer if the corn was not removed from the refrig­er­a­tor as spec­i­fied above). (You can also place these on an edged bak­ing sheet in a 425° oven and roast for about 20 minutes.
  6. Put one or two pack­ets of corn on each serv­ing plate and care­fully open the foil. Pull back a few of the husk seg­ments to expose the corn and let guests take it from there. Serve with the remain­ing fla­vored but­ter. Def­i­nitely pro­vide plenty of napkins.

Parme­san Rose­mary Butter

8 table­spoons unsalted but­ter
2 cloves gar­lic, peeled and minced
1 table­spoon fresh lemon juice
2 tea­spoons fresh rose­mary leaves, minced
½ tea­spoon sea salt
¼ cup grated Parme­san cheese
  1. In a proces­sor, blend the but­ter until smooth.
  2. Add the gar­lic, lemon juice,
    rose­mary, and salt, and pulse to incorporate.
  3. Add the parme­san and process to
    incorporate.
  4. Put in a small con­tainer, cover, and refrig­er­ate until ready to
    use, or form into a log on a sheet of plas­tic wrap, enclose in plas­tic wrap,
    enclose in an addi­tional sheet of foil, and freeze for later use.

FALL CAKE POPS

  fall cake pops


Ingredients:

  • One 9 x 13 cake, any flavor
  • One can (16 oz) prepared frosting, any flavor
  • 1 lb orange candy coating
  • About 48 lollipop sticks
  • Food-safe markers or 2 tbsp chocolate chips

Preparation:

1. Prepare a baking sheet by lining it with aluminum foil or waxed paper.
2. Place the cake in a large bowl, and crumble it roughly with your hands. Once it's in fine crumbs, add about 2/3 of the frosting and begin to mix it with your hands into the cake crumbs, working until the mixture is evenly moistened. You want the cake mixture to easily hold together when you press it into a ball, but still retain a little texture. My personal preference is to have some “crumb” left to the crumb, so that it is not just a gooey ball. Of course, tastes vary, so if it seems as if the cake mixture is too dry, or you like a gooier taste, add more frosting until you're happy with the taste and texture.
3. Using a cookie scoop or teaspoon, form the mixture into small balls. Roll the balls between your palms to round them, then press them down slightly so that they're squat balls, similar to a pumpkin shape. Once all of the pumpkins are formed, place them on the prepared baking sheet and freeze until firm, at least 1 hour.
4. After the pumpkin cake pops have been frozen, remove them from the freezer. Melt the candy coating in the microwave and stir until completely smooth.
5. Use a skewer to poke a hole in the top of a pumpkin, then dip the tip of a lollipop stick in the candy coating and press it into the hole. This will help anchor the stick into the cake pop.
6. After all of the pumpkins have been skewered, dip a pumpkin fully into the candy coating until it's submerged. Take it out of the coating and gently tap the stick against the lip of the bowl so that excess coating drips off. Sit the pumpkin back on the baking sheet with the stick up in the air and let the coating set completely.
7. Once all of the pumpkins are dipped and the coating has hardened, melt chocolate chips and put the melted chocolate in a plastic bag. Snip a corner off the bag and use it to pipe on their eyes and mouths. An easier alternative is to use a food-safe marker to draw faces on the pumpkins.
8. Store pumpkin cake pops in an airtight container in the refrigerator for up to a week. For the best taste and texture, allow them to come to room temperature for about 20 minutes before serving.

PUMPKIN BUTTER

Pumpkin Butter on hot biscuits,,, yummy


I  made this last year and my kids loved it... I also canned some for gifts and had great response.. I did twick it a lil bc i don't care much for cloves so i only did a 1/4 of teaspoon..

Ingredients

  • 1 (29 ounce) can pumpkin puree
  • 3/4 cup apple juice
  • 2 teaspoons ground ginger
  • 1/2 teaspoon ground cloves
  • 1 1/2 cups white sugar
  • 2 teaspoons ground cinnamon
  • 1 teaspoon ground nutmeg

Directions

  1. Combine pumpkin, apple juice, spices, and sugar in a large saucepan; stir well. Bring mixture to a boil. Reduce heat, and simmer for 30 minutes or until thickened. Stir frequently.
  2. Transfer to sterile containers and chill in the refrigerator until serving.

APPLE CIDER

 APPLE SPICED CIDER

Ingredients


  • 1/2gallon(s) apple Juice
  • 1/3cup(s) dark brown sugar
  • stick(s) cinnamon
  • whole allspice berries
  • (1/2 inch by 1/2 inch) chunk fresh ginger, peeled
  • whole cloves
  • slice(s) orange

Directions
  1. In a 3-quart saucepan, combine cider, sugar, cinnamon sticks, allspice berries, ginger, and cloves. Heat to a simmer and allow to cook 20 minutes. Strain into a punch bowl and garnish with orange slices. Serve warm